
This chapter explains the ceterm window, which is a visual tool that you use to interact with a command shell such as the Korn shell.
This chapter describes the following:
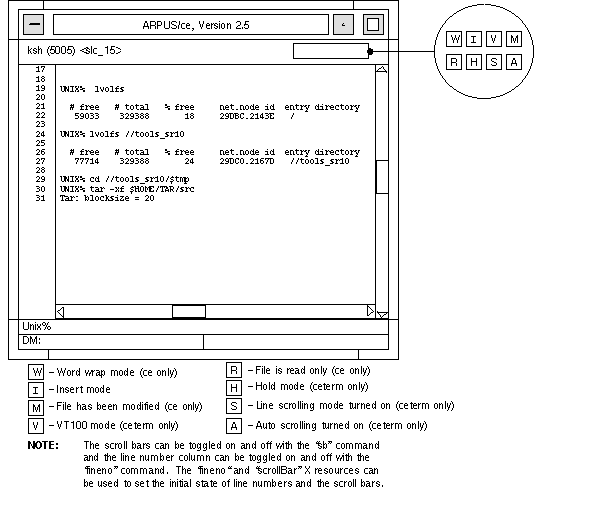
As shown in Figure 4-1, a ceterm window closely resembles a Ce window and includes several additional components. The ceterm window is used in very much the same way as the various vendors' visual shell tools (e.g., DEC's decterm, HP's hpterm, IBM's aixterm, Sun's shell tool).
You can start a ceterm window in any of the following ways:
The primary addition is the shell input window, which is the window into which shell commands are typed. The shell prompt appears in this input window. This window is actually a single-line Ce edit window that accepts the same edit operations that you can perform while editing a file.
Output from the shell and from the commands executed within the shell appears in the transcript pad. The transcript pad is simply a read-only Ce edit window. That is, all of the operations that you can perform on a read-only Ce window (copying, scrolling, cursor movement, etc.) can be performed within the transcript pad.

Figure 4-1. Appearance of ceterm Session
As you can see in Figure 4-1, a ceterm window is based on the Ce window but includes several additional components related strictly to ceterm. In Chapter 1, Figure 1-1, the main window (component number 9) was called the edit window. In a ceterm window the main window that receives the command output is referred to as the transcript pad. The ceterm window also includes the following:
In addition to the new visual cues accompanying a ceterm window, ARPUS/ce includes several commands related specifically to ceterm windows but not to Ce windows. Each of the commands described below have corresponding on-line help systems which can be viewed by typing pressing "F9" (or the "Help" key on Sun keyboards) and typing the command name at the "Help on:" prompt.
cp, cpo, cps
These commands create processes and accept command names and arguments in the same form
that you would use in a shell. "cp" is synonymous with ceterm, which creates a new process and
a corresponding ceterm window within which to run the process (usually a command shell such as
"/bin/ksh"). "cpo" and "cps" both create background processes that have no windows associated
with them.
eef
This tells ceterm to insert and end-of-file character, usually used to terminate a program's standard
output or, more specifically, to terminate the current ceterm and corresponding shell. The "<Ctrl>
d" key is defined to insert an end-of-file character, just as "<Ctrl> d" is used in a normal shell
window.
env
This command takes as an argument a shell environment variable and displays in the ceterm editor
output window the value of that environment variable, if any.
vt
This command puts the ceterm window in vt mode to simulate a virtual terminal. Programs that use
curses and other vt-style control methods can be run while in vt mode. While in vt mode keystrokes
are passed by ceterm directly to the application; even the "Escape" key, normally used to move the
cursor to the "Command:" prompt, is passed on. Therefore to get back out of vt mode into ceterm
mode, the cursor must be moved via the mouse to the "Command:" prompt, at which point the "vt"
command can be executed again.
wa
This command puts the ceterm window in autohold mode, in which the window is automatically put
in hold mode whenever a windowfull of output is received in the transcript pad. This command is
normally invoked via the "<Ctrl> a" keystroke.
wh
This command puts the window into or out of hold mode. It is normally invoked via the "<Ctrl> h"
key.
ws
This command puts the window into or out of scroll-by-line mode. It is normally invoked via the
"<Ctrl> s" key.
As evidenced by the constant reference to key definitions, one of the best ways to learn the behavior of these commands is to learn which keys they are associated with and use those keys in a practice session. You can easily determine key definitions by referring to Appendix A, Key Summary, which lists the key definitions for a default installation of Ce and read your personal "$HOME/.Cekeys" file, which was automatically installed for you when you ran "ce_init" as explained in Chapter 2, Environment Customization.